Wooden garden edging is a quick and easy way to improve your outdoor space and separate your lawn from the garden border and flower beds
Wooden lawn edging also provides a crisp clean edge around your lawn that’s easy to install and low-cost – here’s how to install some border edging at home
Wooden Landscape Edging Tools
- Builders String – https://amzn.to/33dGqrj
- Half Moon Edger – https://amzn.to/3t8XpVT
- Bulb Auger – https://amzn.to/3gJJUJY
- Weed Control Fabric- https://amzn.to/3e3YiuF
- Wooden Treated Board

Step 1 – Mark the Edge
The first step to edging is try to mark out your edges where your wood landscape edging will be along your garden borders.
I’m using just a piece of builders line and in this particular case we’re going to be tidying up an area of grass to improve he garden space near to the driveway and install some timber edging.
This area never grows properly and is always badly damaged during the spell of drought probably because the roots are too short so installing some garden edging is perfect to tidy things up.
This is being marked out a bricks width using the line so I’ve got a steady line to follow using a gentle using a half moon edger
Step 2 – Cut your border edging with a Half Moon Edger
It does help to have a sharp blade on the tool and also it can help if you’re finding it difficult to push into the ground to saturate the ground maybe the day before just so it’s easier to work with.
After the sections been cut out I’d like to then cut the grass into sections going the opposite way just into more manageable chunks you can lift out with a spade
When I’ve dug down in some sample areas you can really see that it’s just laid onto the hardcore of the house foundation there’s no chance you’re gonna get good quality grass growing in this sort of shallow root system
One thing I’m finding everywhere is leather jackets these things will definitely have been a contributing factor to why the lawns in such bad condition I’ve actually made a video on how to treat leather jackets if you want to check that out.

Step 3 – Preparing the Wood Landscape Edging
I’m using a four by one pressure treated timber for my wood landscape edging with some fixing pegs
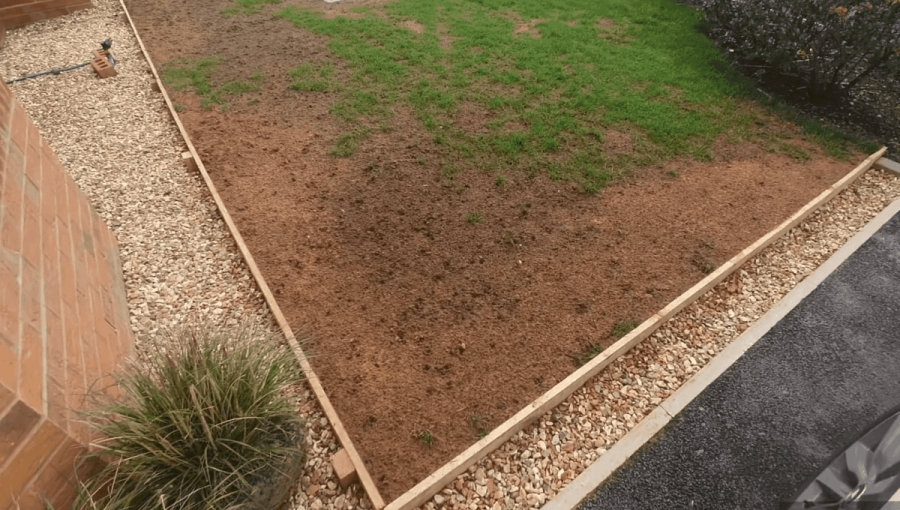
I’ve laid the timber edging boards out so I can get a feel of how the edging might look on the lawn and I would suggest measuring up for your lawn tried to get a feel of whether you need four by one or maybe a six by one depending on the depth of edge you need
Either way at this point you can start to see the shape of the lawn looking a lot more crisp thanks to this border edging. It’s now time to take out any rocks and other debris that you might find during the installation process.
Featured Products
Step 4 – Install Timber Edge Supports
In the next step I’m going to show you how to install the posts and fixing pegs to the timber edging boards.
Once all the debris has been removed and the edges have been cut you can then start installing the uprights that will hold our wooden garden edging.
To install the boards I like to lay all the boards out so I can see what I’m working with you also need to pay consideration if you’re going to look to join any boards together and ideally you want to try and put your joins in places that might look even.
In my case I’ve split the join to join up two boards in the middle of the lawn, mark the lengths out with the set square and cut along.
Using the spirit level you can find the level of the ground you can see from here some of the low spots of the lawn that are going to need leveling
The good thing about using this log roll type of edging is I can also use it as a screed when I’m laying the topsoil down so I get a real nice and flat finish.
For the posts I’m going to be using four by two treated timber, I cut the depth of the post between two and three times the length of the board put in a slight angle on the bottom of the peg to make it a little bit easier to knock in the ground
The easiest way I found to produce the holes is to use a bulb auger the one I’m using I’ve linked above and it is the easiest method to produce holes that you can just drill down with the auger and then knock the post in
I’m drilling down with the auger using a sacrificial piece of wood on the top to knock it in.
I’m then fixing the board to those posts using some screws through the back, just check everything is level before putting in the final screws in and we should have something that’s pretty solid.
Step 5 – Final Touches
After all the log roll posts are in and the board’s been secured the last step is to finish off the edge in some sort of gravel just to tidy up all the finish and help suppress the weeds.
In some parts I did use a weed suppressant fabric which I’ve linked above which will give you another protection to stop weeds coming through
The overall look of the lawn looks much crisper. Using this leveling mechanism with these boards helps me get a nice level finish. This is useful when I’m putting the topsoil down to the lawn for leveling.